Back to all lessons
Lesson library

Manage site plans

Learn how to add, upgrade, downgrade, and cancel your site plans.

Note:We’re transitioning to Workspaces, and are in the process of updating our content.Visit the Workspaces blog postto read more about these updates and changes, or visit ourupdated lesson on how to manage site plans. You can alsolearn how to check if your account is on Workspaces.
This video features an old UI. Updated version coming soon!

您的网站计划-这是单独的帐单从您的帐户计划-使您有可能使您的项目live在自己的web自定义域。

In this lesson, you’ll learn all about how to manage your Webflow site plans with the following:

  1. Understand a site plan
  2. View the current site plan
  3. Choose a site plan
  4. Add or upgrade a site plan
  5. Switch a site plan’s billing frequency
  6. Downgrade a site plan
  7. Access site plan invoices
  8. Transfer a site plan to a different project
  9. Cancel a site plan
  10. Understand proration and refunds

Understand a site plan

Each individual project that you would like to publish to a custom domain needs its own site plan (sometimes referred to as a hosting plan). The site plan allows you to point a custom domain to your Webflow site so you can host it with Webflow and have it securely stored on Amazon Web Servers and delivered over the Fastly Network.

Read more aboutsite plan details and the benefits of hosting with Webflow.

Important:Site plans are billedseparately从你的Webflow账户计划。帐户计划不提供托管。To manage your account plan, readManaging your Webflow Account plan.

View the current site plan

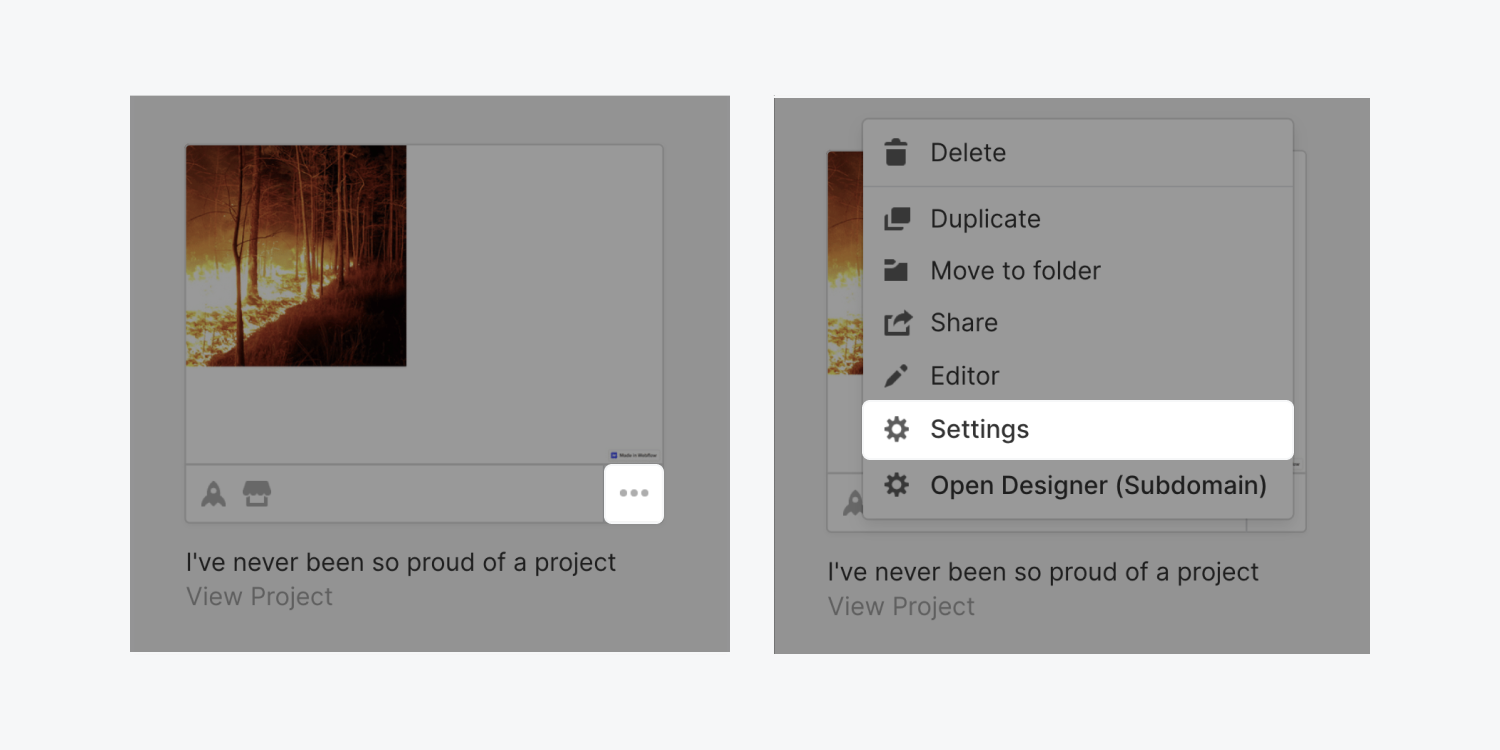
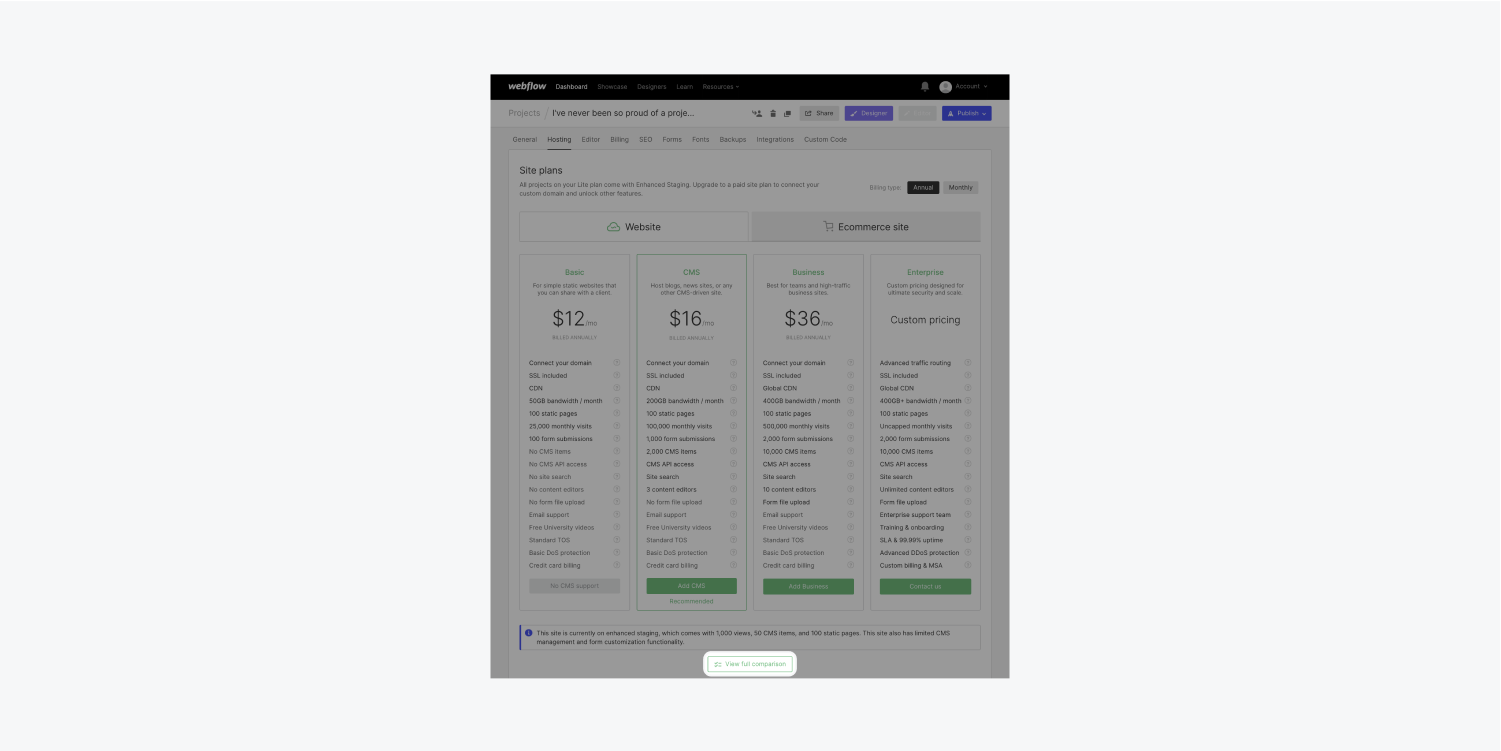
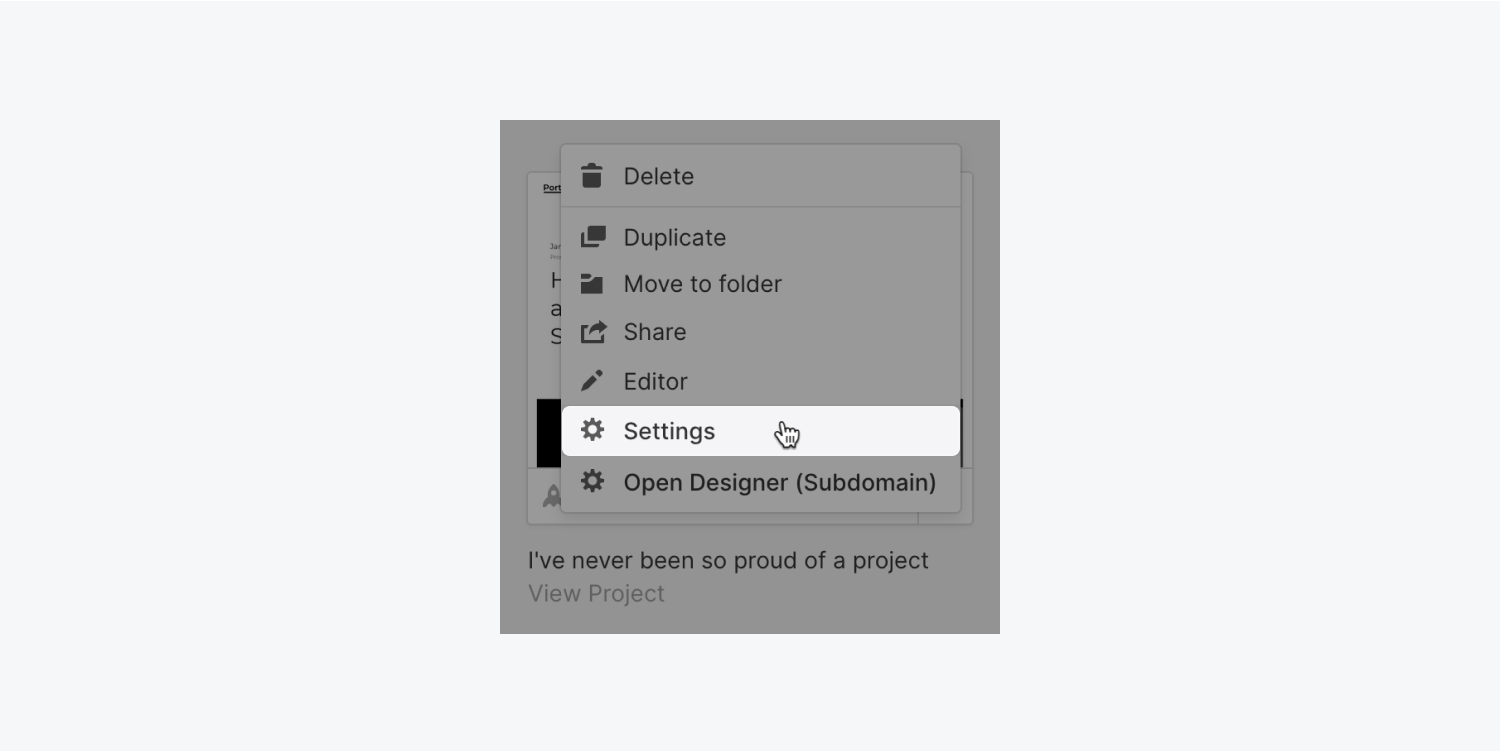
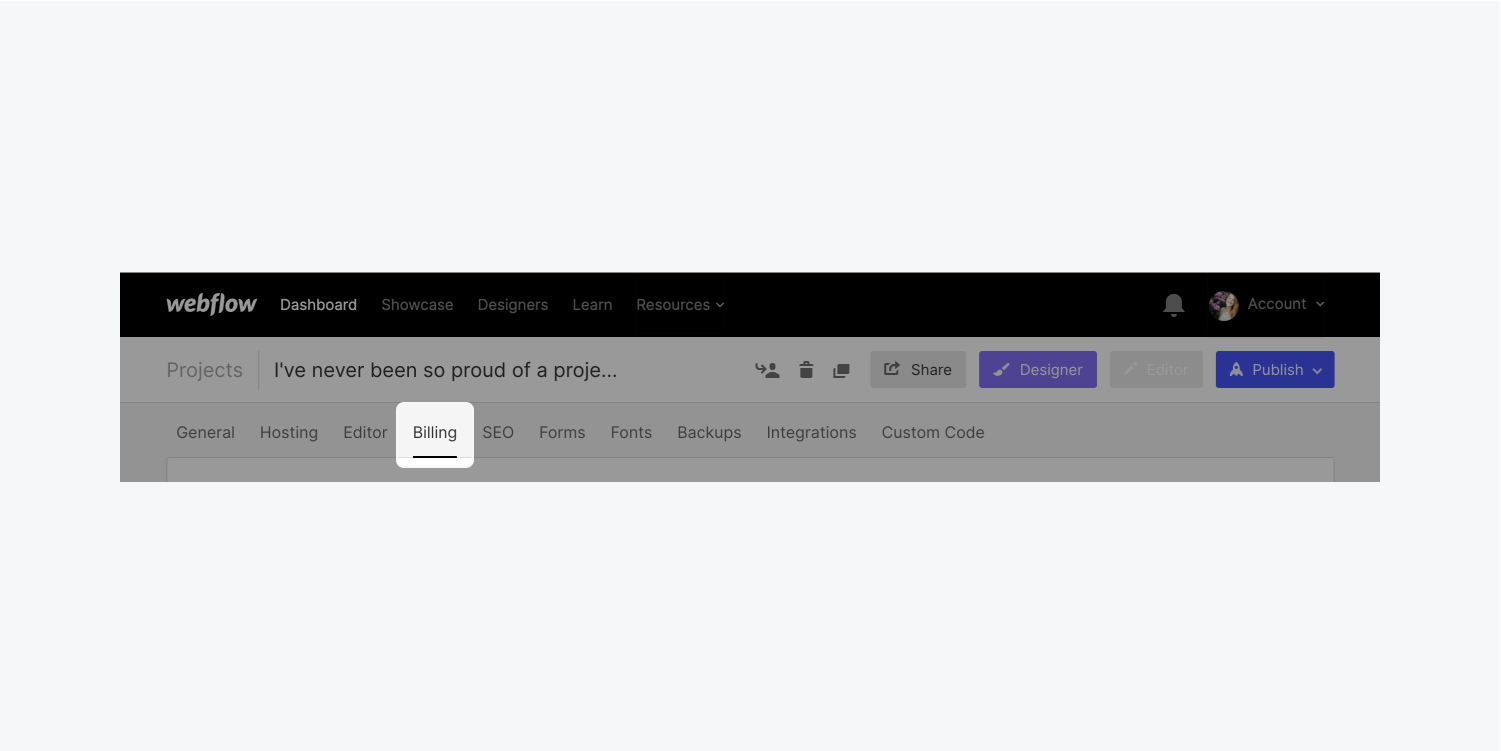
You can manage any project’s site plan from yourProject settings>Hostingtab.

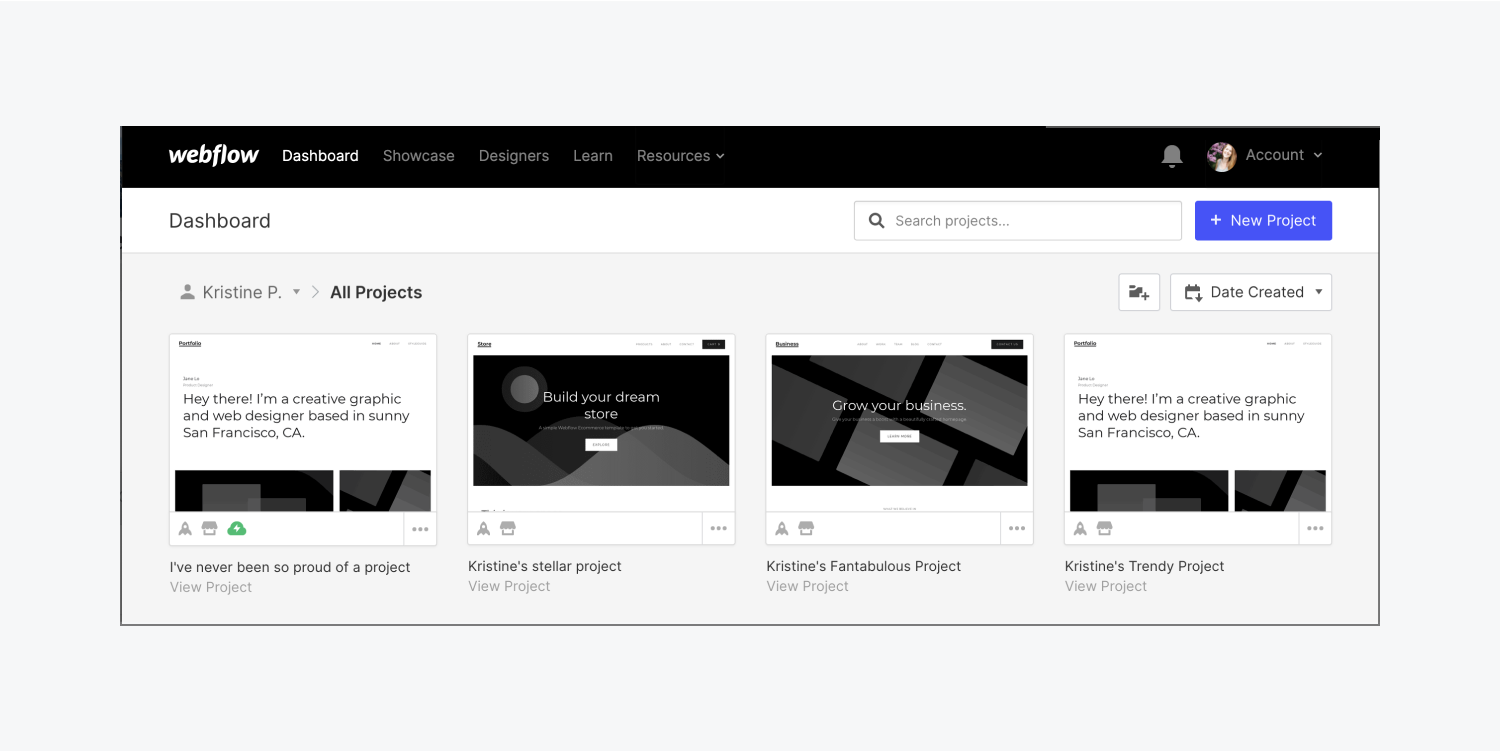
To make sure you are in the correct project’sHostingtab:

  1. Go to yourDashboard
  2. Locate theprojectwhose site plan you want to manage
  3. 点击the3 disclosure dotsto open options for that project
  4. 点击Settings
  5. Check thenameandsubdomainof the project in theGeneraltab to make sure you’re in the correct project
  6. 点击theHostingtab to see site plan options available for your project (or your current site plan)
  7. 点击theWebsitetab to see non-Ecommerce options, and click theEcommerce sitetab to see Ecommerce options
Visit your Webflow Dashboard to choose the project whose site plan you want to manage.
Visit your Dashboard to choose the project whose site plan you want to manage.
Within your Dashboard, select the project whose site plan you want to manage. Click the 3 disclosure dots to access your project’s Settings. 
In your Dashboard, select the project whose site plan you want to manage. Click the 3 disclosure dots to access your project’s Settings.
In the General tab of your project’s settings, double check that the name and subdomain of your project match with the project whose site plan you want to manage.
In the General tab of your project’s settings, double check that the name and subdomain of your project match the project whose site plan you want to manage.
项目设置中的托管选项卡将高亮显示,以显示您可以在何处为您的项目购买站点计划。
In a project’s settings, click the project’s Hosting tab to access the various site plan options available for your project.
In the Hosting tab of a project the option to choose between Website plans and Ecommerce plans is highlighted. Website plans do not include the ability to use Webflow’s native Ecommerce. Ecommerce site plans give you the ability to use Webflow’s native Ecommerce. 
In the Hosting tab of a project you can choose between Website plans (which do not include the ability to use Webflow’s native Ecommerce), or Ecommerce site plans (which give you the ability to use Webflow’s native Ecommerce). Click either tab to switch from one set of plan options to the other.

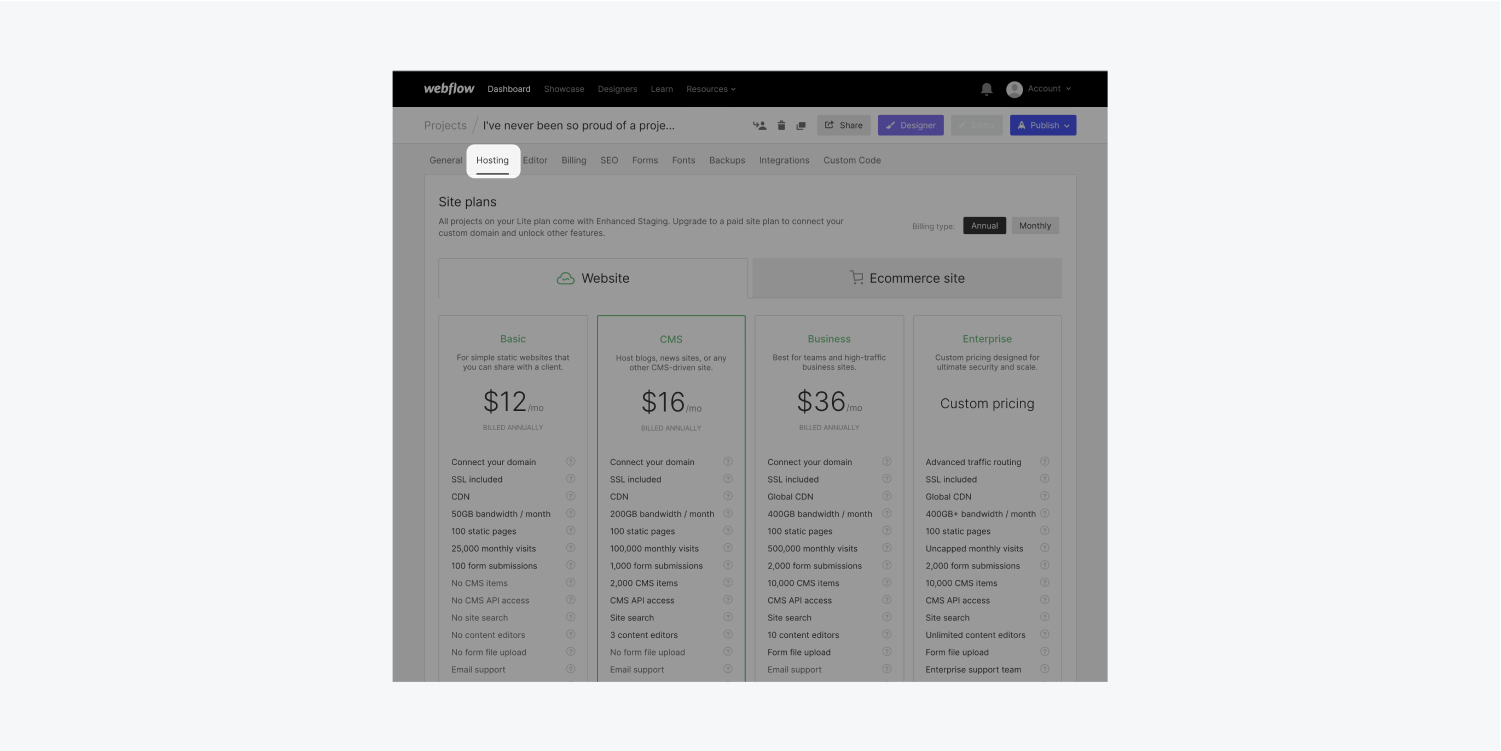
您还可以看到当前的站点规划。如果您还没有将站点规划添加到您的项目中,则没有付费站点规划显示为您的当前计划。Instead, your project will either be on aFree staging plan(if you are on the Free account plan) or anEnhanced staging plan(if you are on a paid account plan).

如果你还没有一个付费网站计划添加到你的项目,并在免费帐户计划,你的项目的主机选项卡将显示你是一个免费分期计划,这是高亮下方的付费网站计划选项。
If you don’t yet have a paid site plan added to your project and are also on the Free account plan, your project’s Hosting tab will show that you are on a Free staging plan.
If you don’t yet have a paid site plan added to your project and are also on a paid account plan, your project’s Hosting tab will show that you are on an Enhanced staging plan, which is highlighted below the paid site plan options.
If you don’t yet have a paid site plan added to your project and are also on a paid account plan, your project’s Hosting tab will show that you are on an Enhanced staging plan.
项目设置中的项目托管选项卡显示了如何在已添加到项目的计划上使用“当前”名称指示当前站点规划。
In your project’s Hosting tab, you can see your current paid site plan. You can upgrade, downgrade, or cancel it at any time.

Choose a site plan

In yourProject settings>Hostingtab, you'll also be able to add a site plan to your project. Or, if the project already has an active site plan, you canupgrade the plan.

Must know:网站计划费用是根据与您的帐户相关联的默认信用卡收取的。

Which site plan do I need?

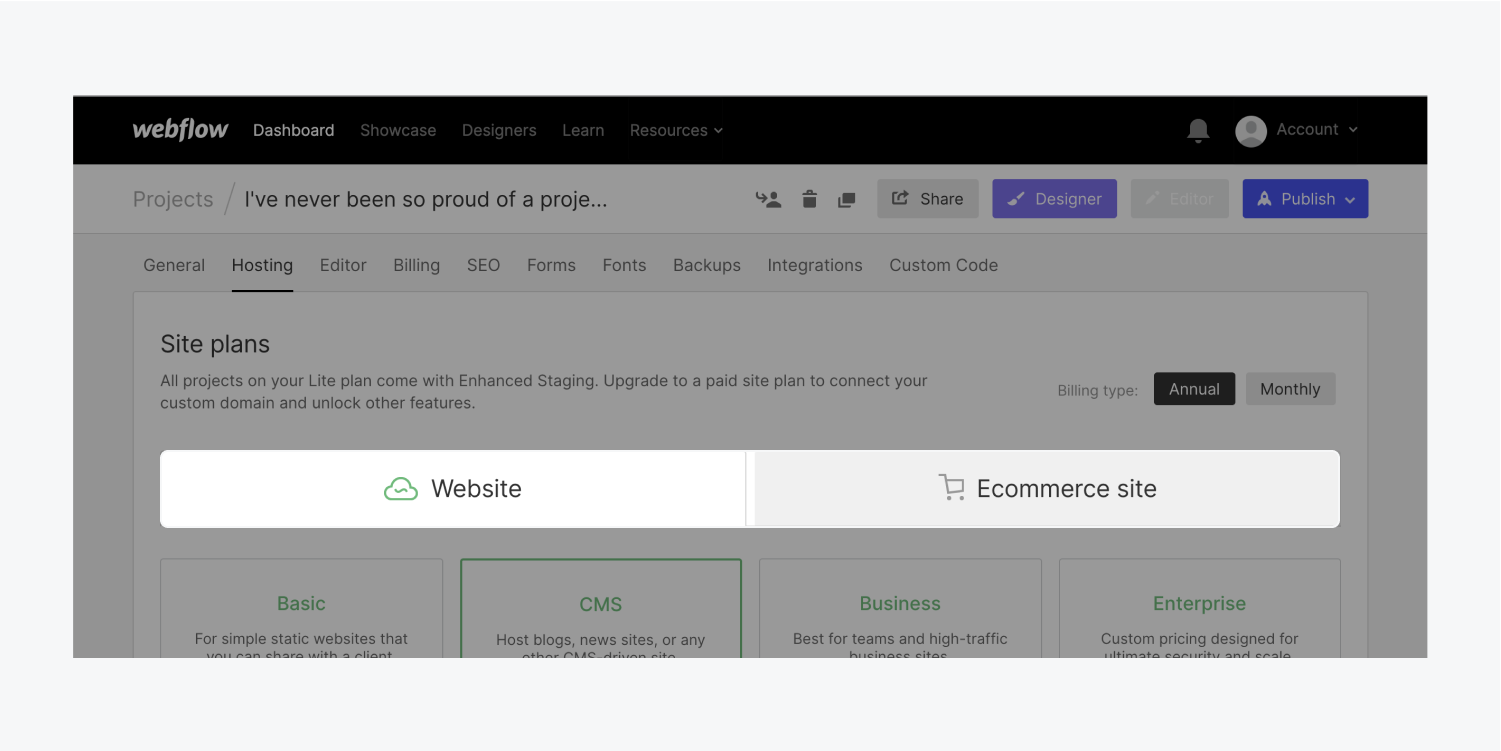
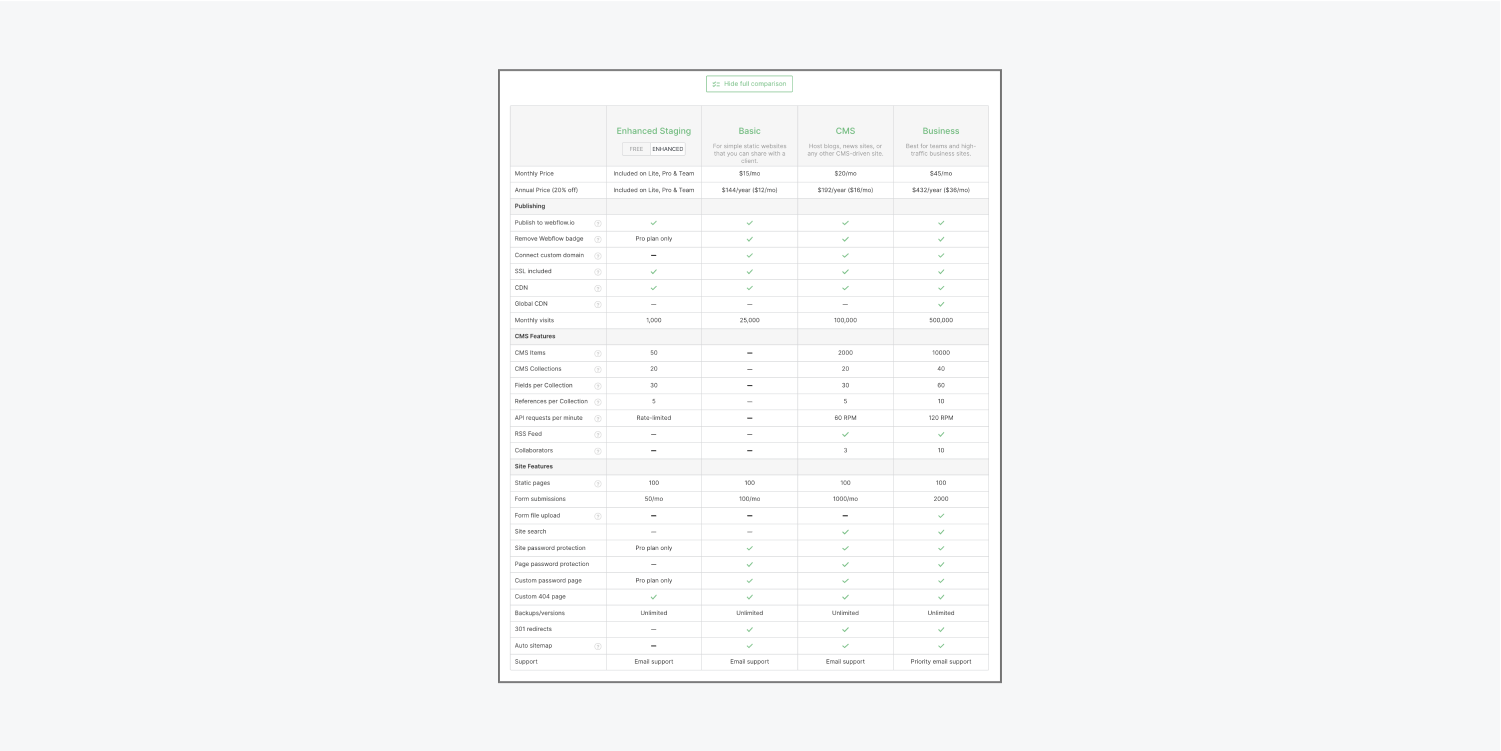
项目的需要决定了所选择的站点规划。The following is a brief overview, but you can read more about each plan and its associated features in the site plan section of ourpricing page. Or you can view a detailed comparison table of the various site plan features in your project’sHostingtab:

  1. Go to yourProject settings>Hostingtab
  2. Choose theWebsitetab (e.g., not the Ecommerce site tab)
  3. Scroll downbelow the site plan options
  4. 点击theView full comparisonbutton to reveal the detailed comparison table
  5. 点击theHide full comparisonbutton to hide the table
In your project’s Hosting tab, you can view a full comparison of Website plan options by clicking the “View full comparison” button beneath the plan options.
In your project’s Hosting tab, after clicking the “View full comparison” button beneath the plan options, you’ll see a table showing a breakdown of site plan options. Click the “Hide full comparison” button to hide the table.

Free staging plan

If you are on a Free account plan, do not need to host your site on a custom domain and do not need more pages and features that a paid site plan offers, you can use theFree stagingplan to publish your site on the .webflow.io subdomain. TheFree stagingplan允许您的项目拥有最多500个视图、50个CMS条目和2个静态页面。您还将有有限的CMS管理,表单定制功能,并可以测试电子商务功能。(You will need to add a paidEcommerceplan to enable your payment gateway and checkout.)

Enhanced staging plan

If you are on a paid account plan, do not need to host your site on a custom domain and do not need more pages and features that a paid site plan offers, you can use theEnhanced stagingplan to publish your site on the .webflow.io subdomain. TheEnhanced stagingplan allows your project to have up to 1,000 views, 50 CMS items, and 100 static pages. You’ll also have limited CMS management, form customization functionality and can test Ecommerce features on this plan. (You will need to add a paidEcommerceplan to enable your payment gateway and checkout.)

Basic site plan

If you would like to host your site on a custom domain and need access to additional pages and features that a paid site plan offers, theBasicplan is a good starting point.Basicsite plans are specifically for sites that do not use any CMS or Ecommerce features (e.g., your site wouldn’t need a dynamic blog, portfolio, or store). If you want to use CMS or Ecommerce features in the future, you can alwaysupgrade your planat a later time.

CMS or Business site plan

If your site uses CMS features (e.g., your site has a blog or showcases a portfolio of your work), you will need either aCMSorBusinesssite plan — theBasicsite plan option will be disabled.

If you do not need any CMS functionality in your project, you canremove all CMS content and content collaboratorsfrom your project to re-enable theBasicsite plan option.

Ecommerce site plan

If your site uses Webflow’s native Ecommerce features, you will need one of ourEcommerceplans to enable checkout. Click the Ecommerce tab in theHostingtab of your project’s settings to select an Ecommerce plan.

Note:If you have created a project or have purchased a template that uses Ecommerce features, you aren’t locked into using an Ecommerce plan. You can always purchase a CMS or Business site plan for your project, but Ecommerce checkout will be disabled.

Enterprise site plan

If you need to have a site plan tailored to your brand, you can inquire about aWebflow Enterpriseplan.

Add or upgrade a site plan

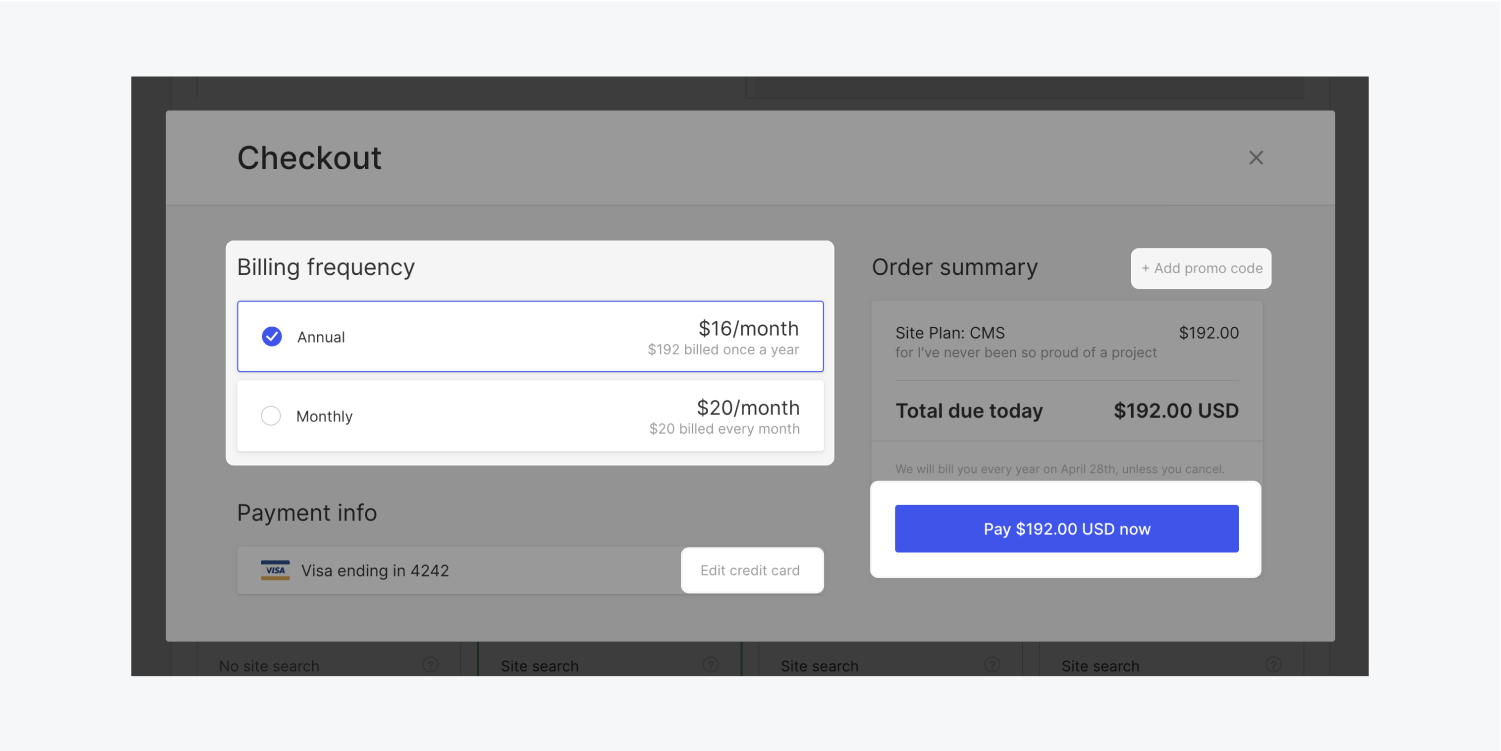
To add a site plan to a project or to upgrade your current site plan:

  1. Make sure you are in the correct project’sHostingtab
  2. Selectannualormonthlybilling (with annual pricing you can pay upfront for a full year at a discounted rate, saving up to 20% compared to paying monthly)
  3. Addthe site plan you want
  4. OPTIONAL: Add apromo codeif you have one
  5. 点击Pay nowto immediately charge your card on file
A project’s Hosting tab in its project settings highlights the billing cycle and “Add plan” buttons to click when choosing a site plan to purchase. 
您可以通过选择计费频率(年计费或月计费)并添加站点计划来添加或升级站点计划。The same concept applies to Ecommerce plans (select the Ecommerce site tab to see Ecommerce plan options).

Pro tip

Before you confirm the purchase of your site plan, please make sure:

  1. You are adding thecorrect site planto thecorrect project
  2. You have selected theappropriate billing frequency(annualormonthly)
  3. You have entered apromo codeif you have one
  4. The correctamountis being charged
  5. The correctcredit cardis being charged
在添加站点计划到其托管标签内的项目后,checkout模式出现确认购买的细节。促销码链接、计划的计费频率、结账时支付的价格、编辑默认信用卡链接和最终购买按钮都被高亮显示,这些都是购买时需要注意和仔细检查的内容。
Check the billing frequency, the promo code, the amount charged, and the credit card on file before adding your site plan.

Switch a site plan’s billing frequency

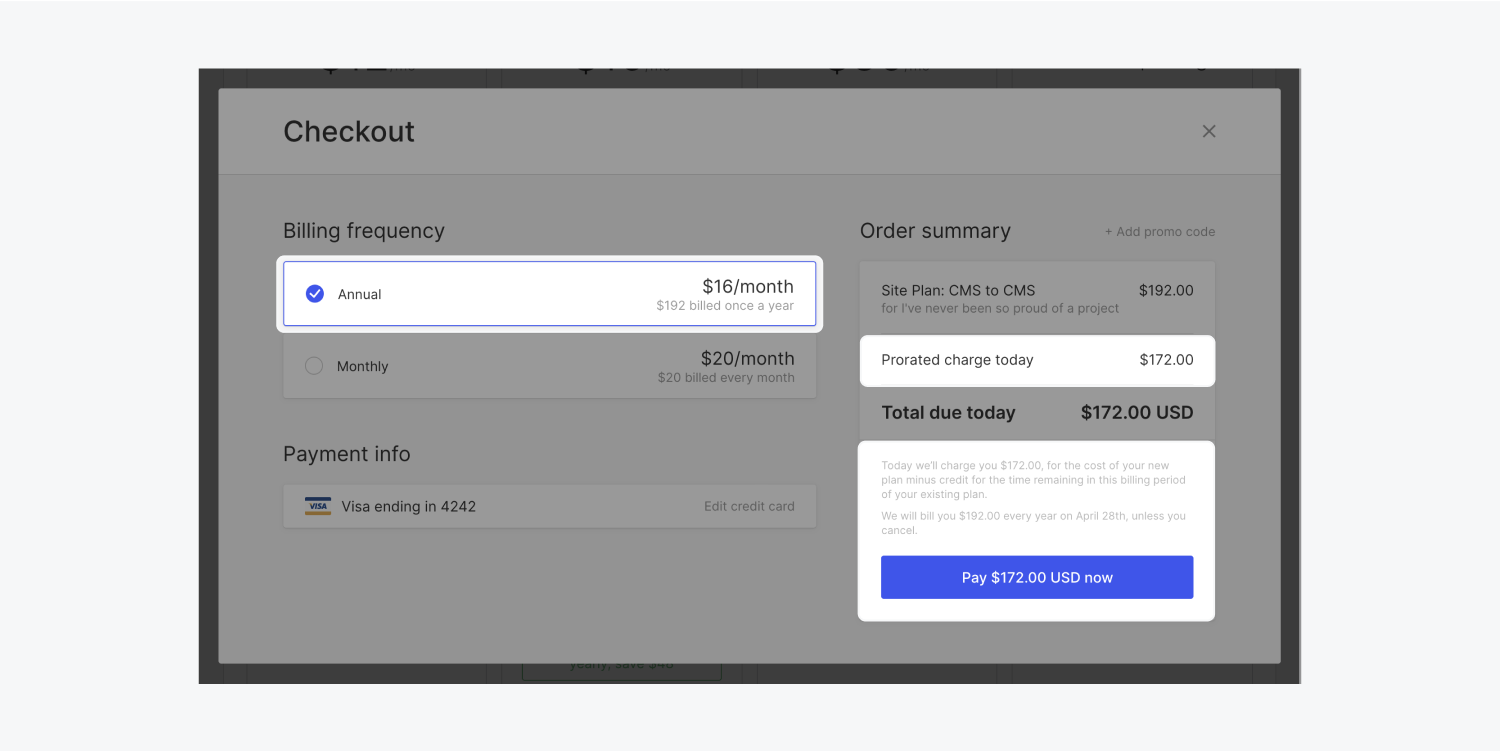
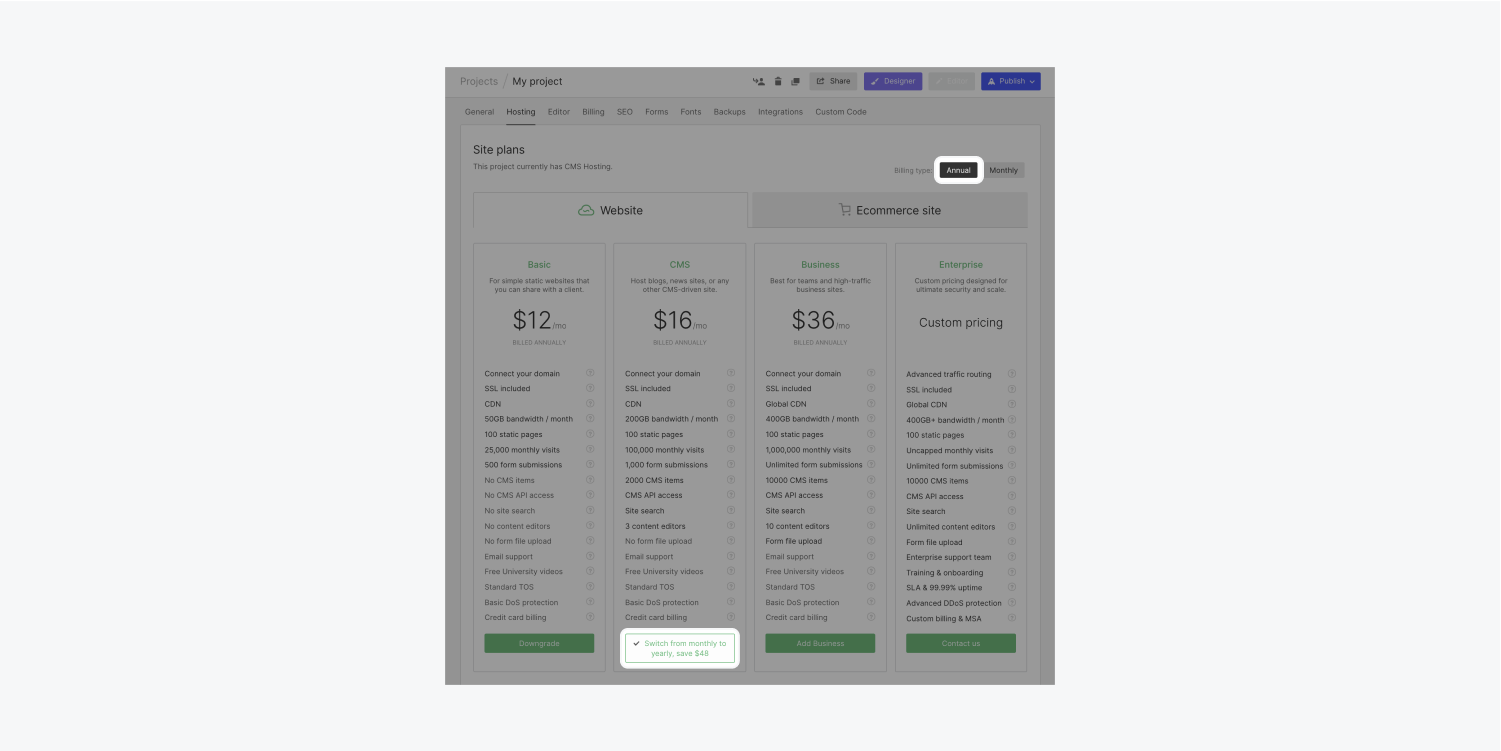
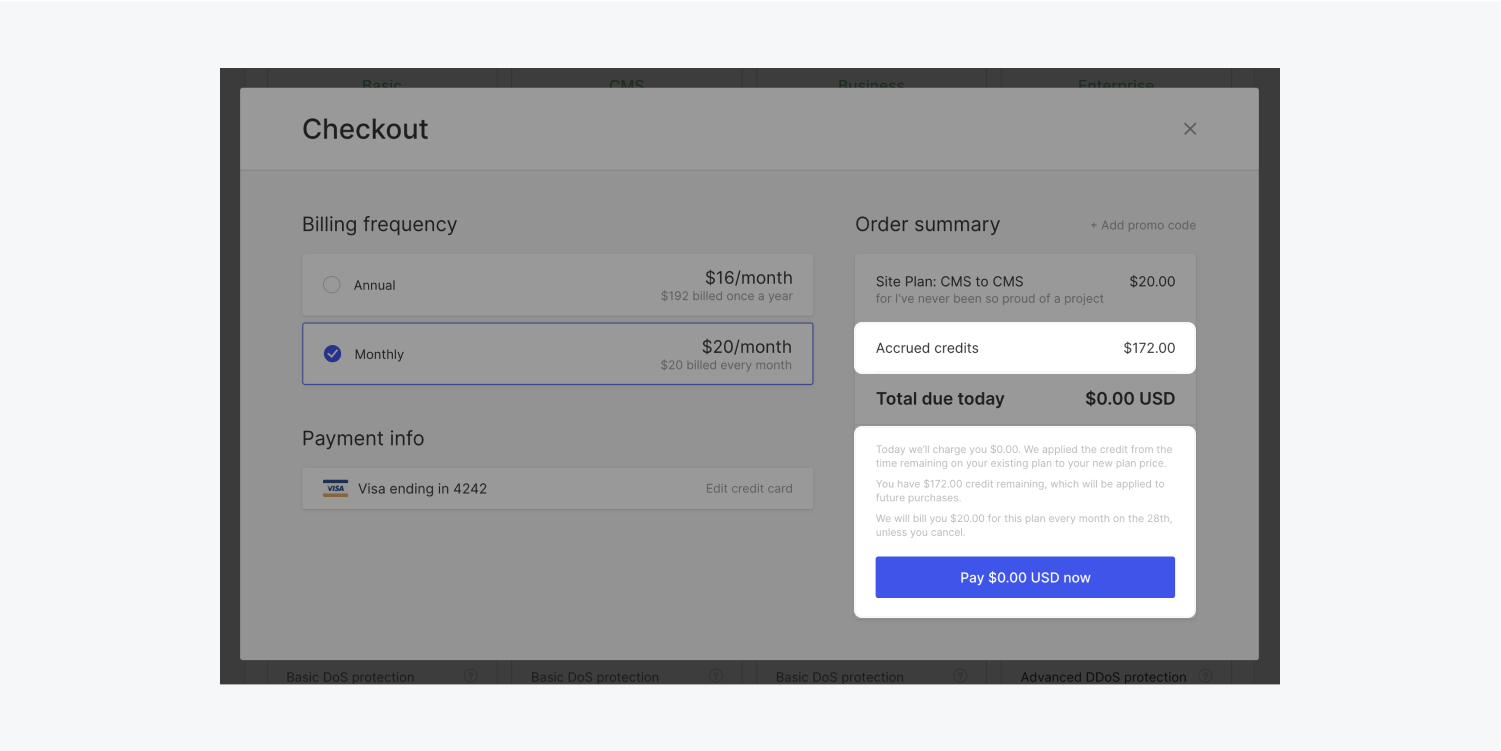
您可以切换站点计划的计费频率,而不必取消当前计划。您为您的新账单周期按比例支付的金额在结帐时可见。

例如,如果您从月度站点计划切换到年度计划,您的未使用时间将被计入月度计划,从而降低年度计划的总价格。

如果您从月度站点计划切换到年度计划,您将被计入月度计划的未使用时间,这将降低年度计划的总价格。在本例中,如果您想从月度CMS站点计划切换到年度CMS站点计划,您将从每月计划中支付的一个月的费用中扣除20美元,从而将年度计划的费用从192美元降低到172美元。
In this example, if you wanted to switch from a monthly CMS site plan to an annual CMS site plan, you would be credited $20 for the price you paid for one month of the monthly plan, reducing your annual plan charge from $192 to $172.

如果您将年度站点计划转换为月度站点计划,您将收到年度计划中未使用时间的帐户积分。在您的信用卡被扣款之前,您的账户信用将被用于任何未来的计划费用。

如果您将年度站点计划转换为月度站点计划,您将收到年度计划中未使用时间的帐户积分。在您的信用卡被扣款之前,您的账户信用将被用于任何未来的计划费用。在本例中,客户希望立即从年度CMS站点计划(192美元)切换到月度CMS站点计划(20美元)。因为他们没有使用年度计划,他们在该计划上的闲置时间价值192美元。从192美元中取出20美元用于支付他们的新月供,剩下的172美元作为账户贷方放回他们的账户(在这里看到的是累算贷方)。
在本例中,客户希望立即从年度CMS站点计划(192美元)切换到月度CMS站点计划(20美元)。因为他们没有使用年度计划,他们在该计划上的闲置时间价值192美元。从192美元中取出20美元用于支付他们的新月供,剩下的172美元作为账户贷方放回他们的账户(在这里看到的是累算贷方)。

Switch from a monthly site plan to an annual site plan

  1. Check that you are in the correct project’sHostingtab
  2. Selectannual
  3. 点击switch from monthly to yearly
A project’s Hosting tab in its project settings highlights the annual billing cycle and “Switch to yearly” buttons to click when choosing to switch from a monthly site plan to an annual site plan.  
When switching from a monthly site plan to an annual site plan, choose the annual billing frequency and press “Switch from monthly to yearly.”

Switch from an annual site plan to a monthly site plan

  1. Check that you are in the correct project’sHosting tab
  2. Selectmonthly
  3. 点击switch to monthly
A project’s Hosting tab in its project settings highlights the monthly billing cycle and “Switch to monthly” buttons to click when choosing to switch from an annual site plan to a monthly site plan.  
When switching from an annual site plan to a monthly site plan, choose the monthly billing frequency and press “Switch to monthly.”

Downgrade a site plan

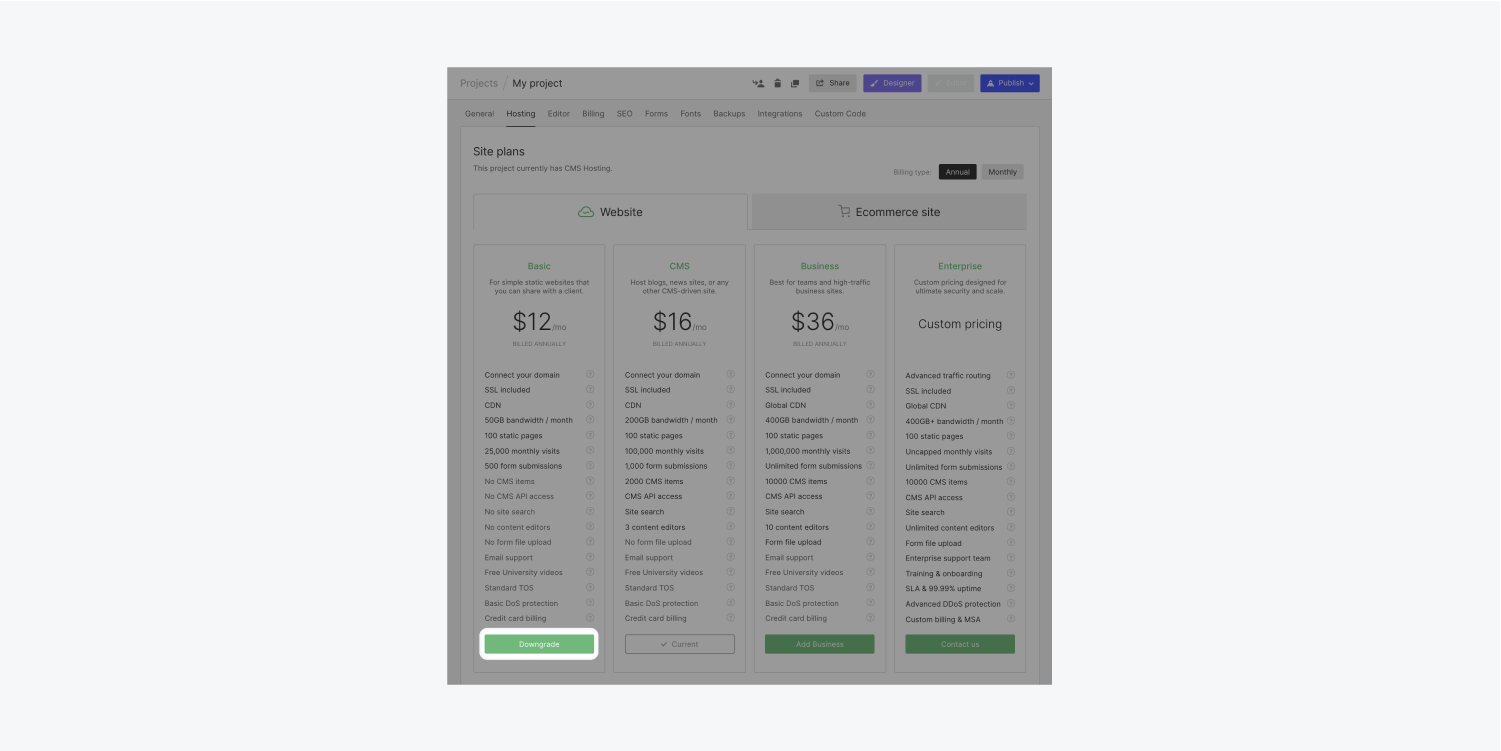
If you use CMS in your project, you can downgrade yourBusinesssite plan to aCMSsite plan. If you don’t use CMS in your project, you can also downgrade from any of the higher plans to theBasicsite plan.

Must know:You need to have an active Ecommerce plan to enable checkout and have a functional store on your domain. To downgrade from an Ecommerce plan to a Site plan, first disable checkout in your Ecommerce settings.

To downgrade your site plan to a lower paid plan:

  1. Check that you are in the correct project’sHostingtab
  2. Selectannualormonthlybilling (with annual pricing you can pay upfront for a full year at a discounted rate, saving up to 20% compared to paying monthly)
  3. Downgradeto the site plan you want
  4. OPTIONAL: Add apromo codeif you have one
  5. 点击Pay nowto downgrade to the lower plan (your total due will be indicated on the "Pay now" button)
Note:When you downgrade your site plan to a lower plan, the checkout modal indicates the prorated account credit you’ll receive for the unused time on the higher plan.
A project’s Hosting tab in its project settings highlights the “Downgrade” button to click when choosing to downgrade to a lower site plan.  
Press the “Downgrade” button under the lower site plan option to which you want to switch.

Why can't I purchase the Basic site plan?

TheBasicsite plan isn't available for sites that use CMS features. To enable theBasicsite plan for a CMS site,remove all CMS features from your design, including content collaborators under yourProject settings>Editortab. Once the CMS features have been removed, you can add or downgrade to theBasicsite plan.

Access site plan invoices

To access invoices for any project that has a site plan added to it:

  1. Log in to your account and head to your WebflowDashboard(either your individual Dashboard or your team Dashboard)
  2. 点击the3 disclosure dotsat the bottom right of any project that has a site plan added to it
  3. 点击Settingsfrom the dropdown
  4. 点击theBilling tabin the Project settings page
  5. Scroll down to thePast invoicessection
A Webflow individual account Dashboard is shown with 4 projects inside of it.
After clicking 3 disclosure dots on a project, its menu is shown with the Settings link highlighted.
The Billing tab of a project with a site plan is highlighted.
A project's Billing tab has the Past Invoices section highlighted.

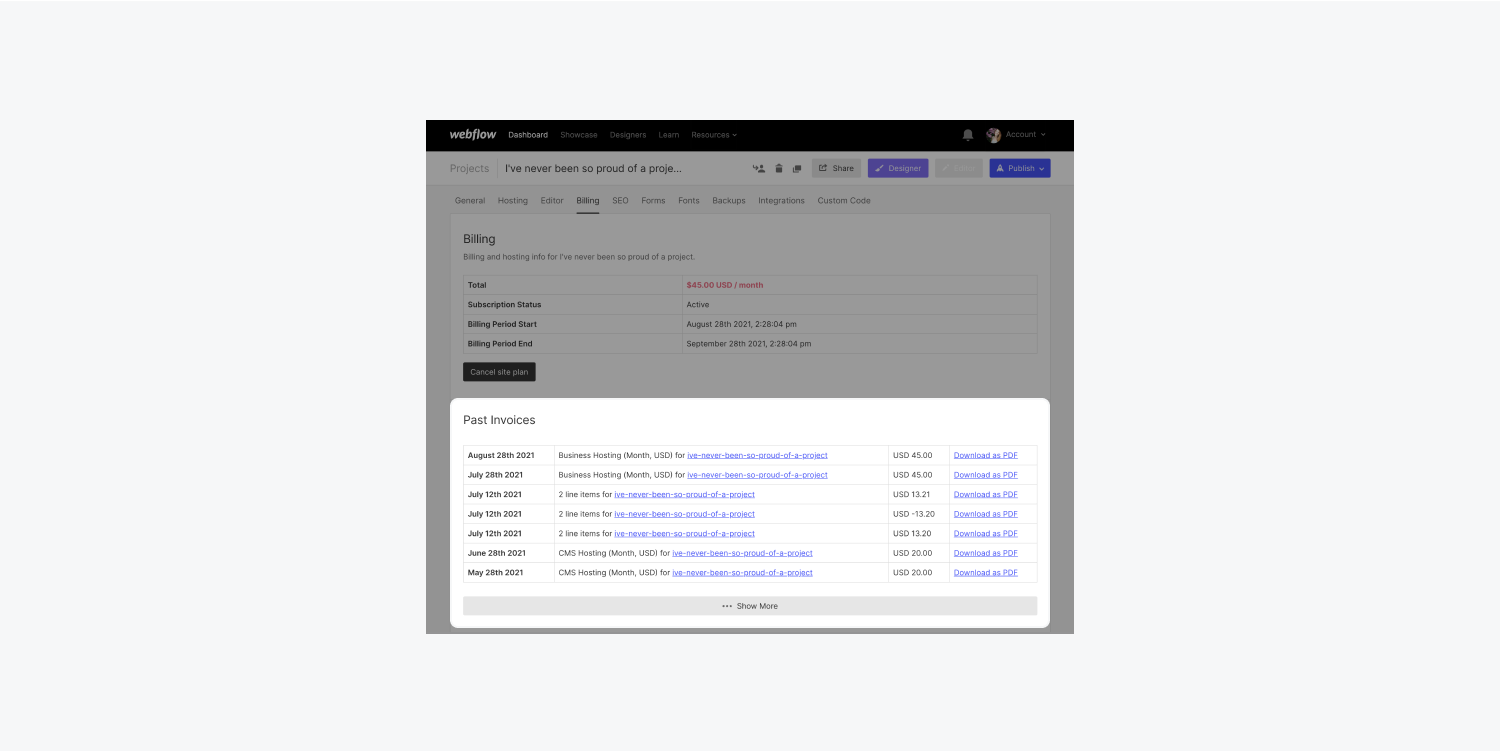
In the Past invoices section you’ll see the date, item(s), and the total paid for each invoice. You can download any invoice by clickingDownload as PDF.

To access the invoices for a different project with a different site plan, repeat the above steps for the different project(s).

Transfer a site plan to different project

Currently, it's not possible for you to transfer a site plan from one project to another using the Dashboard interface, but this is something we plan to support in the future.

In the meantime, if you want to transfer a site plan from one project in your Dashboard to another in the same Dashboard, our customer support team can complete the transfer for you.

Readhow to transfer hosting between projectsto learn which projects are eligible for a site plan transfer, and how to best communicate your request to our customer support team.

Cancel a site plan

Canceling your paid site plan willdowngrade your projectto either the Free staging plan or Enhanced staging plan (depending on the Account plan you’re on), willimmediately remove your custom domains, and willunpublish your sitefrom both its custom domains and the Webflow staging site.

Must know:Site plan cancelation is immediate, even if you have unused time in your site plan’s billing cycle. You do not automatically receive account credit for unused time on a canceled site plan. However, we understand mistakes sometimes happen. If you feel you have canceled your site plan in error, contactcustomer support他们还可以评估你是否有资格获得账户信用、促销码或退款。

To cancel your site plan:

  1. Open your project’sSettings
  2. 点击theBillingtab and check theBillinginformation to make sure you're canceling the site plan for the correct project
  3. 点击Cancel site plan
  4. Choosethe reasonyou’re canceling and type inCANCELto confirm (CANCEL must be typed in all caps)
  5. 点击Cancel site planto make your website unpublish immediately
A project’s Billing tab in its project settings highlights the “Cancel site plan” button to click when choosing to fully cancel a site plan.   
在项目设置中,打开项目的Billing选项卡,然后按下“取消站点计划”按钮,完全取消站点计划并使其脱机。
After visiting a project’s Billing tab in its project settings and choosing to cancel the site plan, a modal will appear that prompts you to choose your reason for canceling, type in the word “CANCEL” and press the “Cancel site plan” button to fully cancel your site plan.  
After choosing to cancel your site plan you will need to select the reason you’re canceling and type the word “CANCEL” in all caps before pressing the “Cancel site plan” button. Once this button is pressed, your site plan is fully canceled.
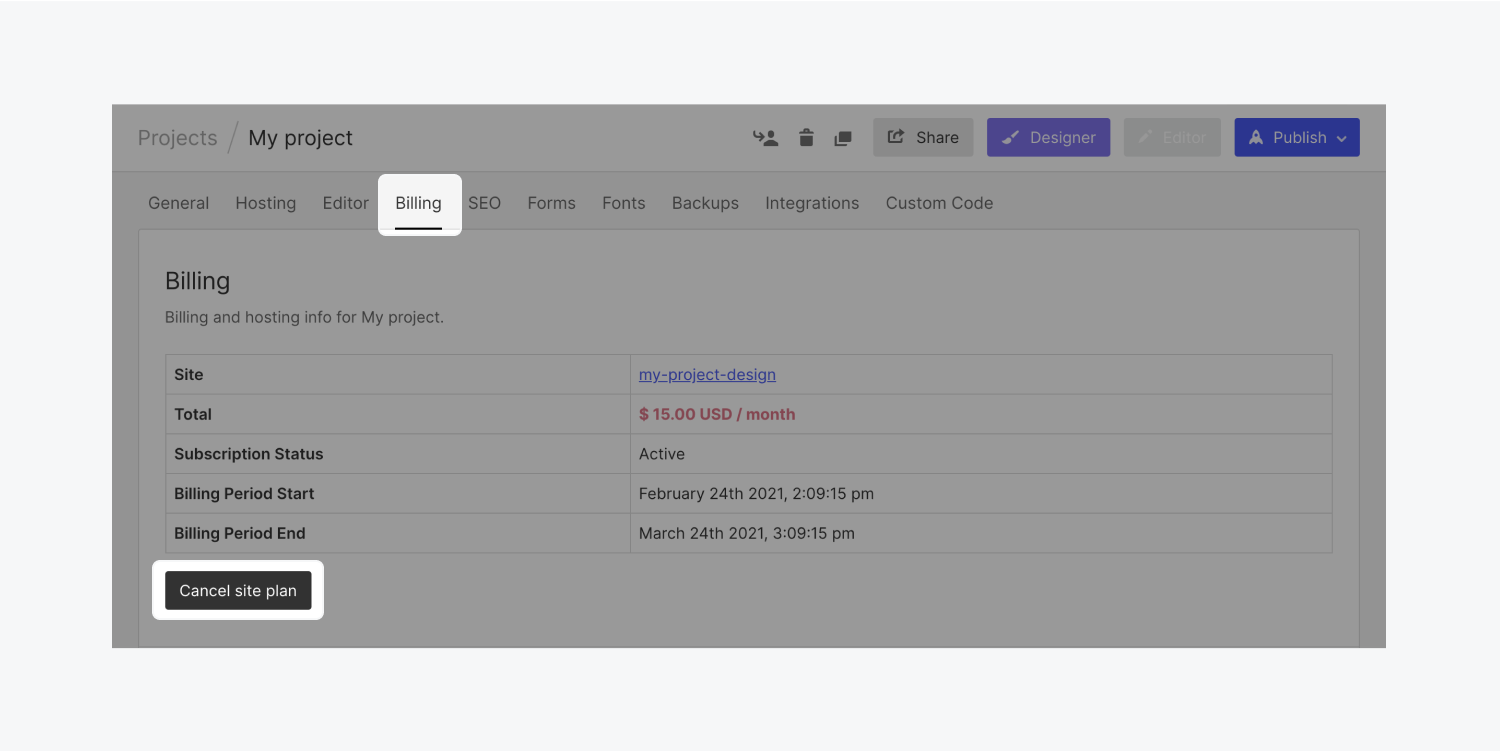
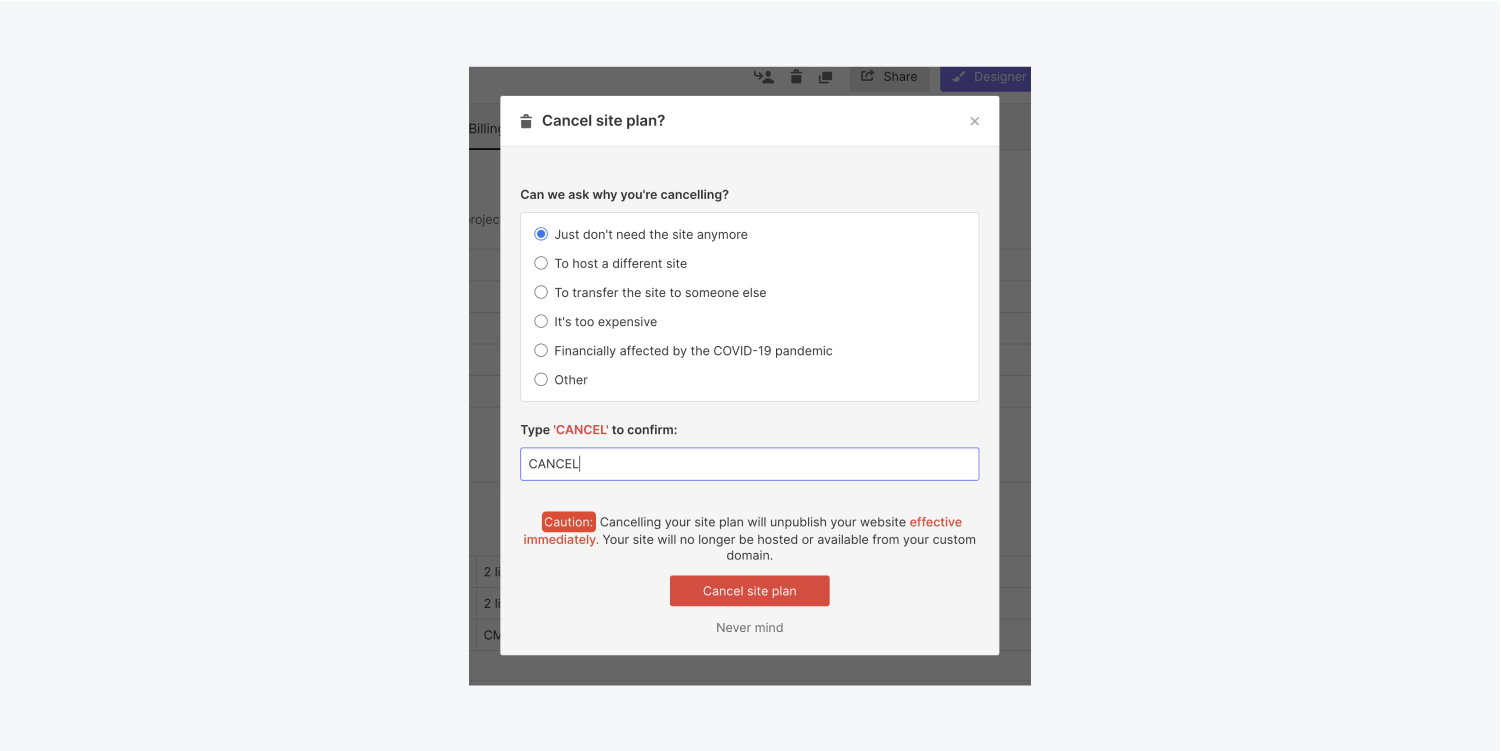
Important:Canceling a site plan will immediatelyremove your custom domains and unpublish your sitefrom its custom domains and the Webflow staging site.

Understand proration and refunds

Webflow prorates plan changes (downgrades, upgrades, or billing frequency switches) based on your existing balance, credits, and how many days you have remaining in your billing cycle. Your prorated charge and credits are visible at checkout.

If you have downgraded, upgraded or switched your billing frequency, Webflow prorates your plan changes and displays the prorated charge and credits in the checkout modal.

If you want to make any changes to your plan, you can determine your prorated charge with the following equation:

  • (current monthly price ÷ 30) x (days left in billing period) - (new monthly price ÷ 30) x (days left in billing period) = Total prorated charge or credit
We generally do not provide refunds(please refer to section 9 of ourTerms of Service), and we do not automatically issue account credit for unused time on a canceled site plan. However, we understand mistakes sometimes happen. If you feel you have canceled your site plan in error, contactcustomer support他们还可以评估你是否有资格获得账户信用、促销码或退款。
Try Webflow— it's free
Baidu
map